

NFC技术在M1卡中的运用学习

NFC技术介绍
NFC(Near Field Communication),一种近场无线通信技术。通讯距离通常为4cm以内,工作频率13.56MHz,通信速率106kbit/s到848kbit/s。
NFC通信由一个发起者(initiator)和一个接受者(target)组成。其工作原理和收音机类似。NFC也支持点到点的通信(peer to peer)。
在刚刚推出的iphone6也支持NFC功能,但是apple目前限制在Apple Pay上的运用,所以距离开发者使用还有一段距离。
在Android NFC应用中,Android手机通常可作为发起者,也可作为NFC读写器。从Android 2.3.3起支持p2p通信。
Android的SDK中,有android.nfc和android.nfc.tech两个包支持NFC技术。
android.nfc包中主要类如下:
- NfcManager用来管理Android设备中指出的所有NFC Adapter,大多Android设备只支持一个NFC Adapter,所以可以使用getDefaultAdapter获取系统支持的Adapter。
- NfcAdapter为NFC Adapter对象,可以用来定义一个Intent使系统在检测到NFC Tag时通知你定义的Activity,并提供用来注册forground tag消息发送的方法等;
- NdefMessage和NdefRecord NDEF为NFC forum定义的数据格式;
- Tag代表一个Tag对象,如一个标签、卡片等。当Android设备检测到一个Tag时,会创建一个Tag对象,将其放在Intent对象,然后发送到相应地Activity中。
android.nfc.tech中定义了可以对Tag进行的读写操作的类,可以分为NfcA、NfcB、NfcF和MifareClassic等。
NFC在Android上的开发
在Android manifest文件中申明和NFC相关的权限和功能选项:
权限申明
由于NFC是在Android 2.3(Level 10)才开始支持的,所以有版本限制
同样,需要硬件支持NFC功能
为Activity申明它支持处理NFC Tag,下面是示例:
<activity android:name=”.NFCDemoActivity”
android:label=”@string/app_name”
android:launchMode=”singleTop”>
<intent-filter>
< action android:name=”android.intent.action.MAIN” />
<category android:name=”android.intent.category.LAUNCHER” />
< /intent-filter>

< intent-filter>
< action android:name=”android.nfc.action.NDEF_DISCOVERED”/>
<data android:mimeType=”text/plain” />
< /intent-filter>

< intent-filter>
< action
android:name=”android.nfc.action.TAG_DISCOVERED” />
< category
android:name=”android.intent.category.DEFAULT”>
< /category>
< /intent-filter>

< !– Add a technology filter –>
<intent-filter>
< action android:name=”android.nfc.action.TECH_DISCOVERED” />
< /intent-filter>
<meta-data android:name=”android.nfc.action.TECH_DISCOVERED”
android:resource=”@xml/filter_nfc”
/>
</activity>
上面的filter_nfc是一个xml的文件,指明了支持处理的NFC Tag类型,filter_nfc.xml格式示例如下:
<resources xmlns:xliff=”urn:oasis:names:tc:xliff:document:1.2″>
< !– capture anything using NfcF –>
<tech-list>
< tech>android.nfc.tech.NfcA</tech>
< tech>android.nfc.tech.MifareClassic</tech>
< tech>android.nfc.tech.MifareUltralight</tech>
</tech-list>
</resources>
三种Activity NDEF_DISCOVERED、TECH_DISCOVERED、TAG_DISCOVERED的先后顺序很重要,Android设备会根据申明的顺序给对应的Activity发送含NFC消息的Intent。
Android NFC 消息发送机制
Android支持下面两种机制:Intent发送机制和前台Activity消息发送机制
所谓Intent发送机制:当系统检测到Tag时,Android系统提供manifest中定义的Intent filter来选择合适的Activity来处理Tag,当有多个Activity可以处理时,会弹出Activity选择窗口由用户选择。
前台Activity消息发送机制:允许一个在前台运行的Activity在读写NFC Tag时具有优先权,就是说前台运行的Activity可以处理该Tag时,就直接发送给这个Activity处理该Tag。
下图显示了Android检测到Tag,消息发送的优先级

对于Intent发送机制只需在manifest中说明即可,而对前台机制还需要通过代码申明。
public class NFCDemoActivity extends Activity {
 private NfcAdapter mAdapter;
 private PendingIntent mPendingIntent;
 private IntentFilter[] mFilters;
 private String[][] mTechLists;
 private TextView mText;
 private int mCount = 0;

 @Override
 public void onCreate(Bundle savedState) {
 super.onCreate(savedState);

 setContentView(R.layout.foreground_dispatch);
 mText = (TextView) findViewById(R.id.text);
 mText.setText("Scan a tag");

 mAdapter = NfcAdapter.getDefaultAdapter(this);

 // Create a generic PendingIntent that will be deliver
 // to this activity. The NFC stack
 // will fill in the intent with the details of the
 //discovered tag before delivering to
 // this activity.
 mPendingIntent = PendingIntent.getActivity(this, 0,
 new Intent(this,
    getClass()).addFlags(Intent.FLAG_ACTIVITY_SINGLE_TOP), 0);

 // Setup an intent filter for all MIME based dispatches
 IntentFilter ndef
    = new IntentFilter(NfcAdapter.ACTION_TECH_DISCOVERED);
 try {
 ndef.addDataType("*/*");
 } catch (MalformedMimeTypeException e) {
 throw new RuntimeException("fail", e);
 }
 mFilters = new IntentFilter[] {
 ndef,
 };

 // Setup a tech list for all MifareClassic tags
 mTechLists
  = new String[][] { new String[] { MifareClassic.class.getName() } };
 }

 @Override
 public void onResume() {
 super.onResume();
 mAdapter.enableForegroundDispatch(this,
     mPendingIntent, mFilters, mTechLists);
 }

 @Override
 public void onNewIntent(Intent intent) {
 Log.i("Foreground dispatch",
     "Discovered tag with intent: " + intent);
 mText.setText("Discovered tag " +
       ++mCount + " with intent: " + intent);
 }

 @Override
 public void onPause() {
 super.onPause();
 mAdapter.disableForegroundDispatch(this);
 }
}
上面的代码只对mafiare one卡可用,另外由于M1卡的专利属于恩智浦公司,所以只有恩智浦生产的nfc芯片才支持对M1卡的读写,非恩智浦公司的nfc芯片则不支持M1卡,小米3使用的NFC芯片不支持M1卡。
[来源] Android NFC 开发教程(2): ApiDemos->NFC->ForegoundDispatch
M1卡结构及读写
Mifare Tag有1K、2K和4K几种容量。其内存分布如下:
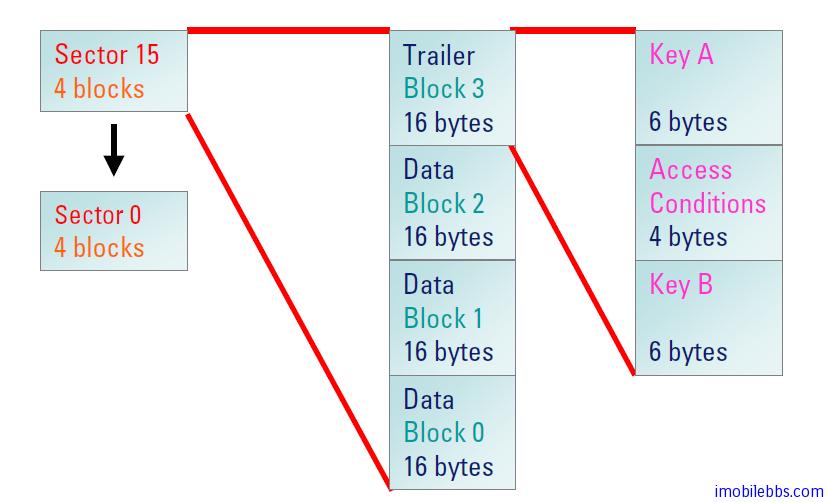
M1卡每扇区的第三块为控制块,有keyA和keyB进行鉴权。缺省的key值一般为全FF或全00,由MifareClassic.KEY_DEFAULT定义。
下面代码示范了在public void onNewIntent(Intent intent)中的主要操作
// 1) Parse the intent and get the action that triggered this intent
String action = intent.getAction();
// 2) Check if it was triggered by a tag discovered interruption.
if (NfcAdapter.ACTION_TECH_DISCOVERED.equals(action)) {
 // 3) Get an instance of the TAG from the NfcAdapter
 Tag tagFromIntent = intent.getParcelableExtra(NfcAdapter.EXTRA_TAG);
 // 4) Get an instance of the Mifare classic card from this TAG
 // intent
 MifareClassic mfc = MifareClassic.get(tagFromIntent);
 MifareClassCard mifareClassCard=null;

 try { // 5.1) Connect to card
 mfc.connect();
 boolean auth = false;
 // 5.2) and get the number of sectors this card has..and loop
 // thru these sectors
 int secCount = mfc.getSectorCount();
 mifareClassCard= new MifareClassCard(secCount);
 int bCount = 0;
 int bIndex = 0;
 for (int j = 0; j < secCount; j++) {
 MifareSector mifareSector = new MifareSector();
 mifareSector.sectorIndex = j;
 // 6.1) authenticate the sector
 auth = mfc.authenticateSectorWithKeyA(j,
 MifareClassic.KEY_DEFAULT);
 mifareSector.authorized = auth;
 if (auth) {
 // 6.2) In each sector - get the block count
 bCount = mfc.getBlockCountInSector(j);
 bCount =Math.min(bCount, MifareSector.BLOCKCOUNT);
 bIndex = mfc.sectorToBlock(j);
 for (int i = 0; i < bCount; i++) {

 // 6.3) Read the block
 byte []data = mfc.readBlock(bIndex);
 MifareBlock mifareBlock = new MifareBlock(data);
 mifareBlock.blockIndex = bIndex;
 // 7) Convert the data into a string from Hex
 // format.

 bIndex++;
 mifareSector.blocks[i] = mifareBlock;

 }
 mifareClassCard.setSector(mifareSector.sectorIndex,
 mifareSector);
 } else { // Authentication failed - Handle it

 }
 }
 ArrayList<String> blockData=new ArrayList<String>();
 int blockIndex=0;
 for(int i=0;i<secCount;i++){

 MifareSector mifareSector=mifareClassCard.getSector(i);
 for(int j=0;j<MifareSector.BLOCKCOUNT;j++){
 MifareBlock mifareBlock=mifareSector.blocks[j];
 byte []data=mifareBlock.getData();
 blockData.add("Block "+ blockIndex++ +" : "+
 Converter.getHexString(data, data.length));
 }
 }
 String []contents=new String[blockData.size()];
 blockData.toArray(contents);
 setListAdapter(new ArrayAdapter<String>(this,
 android.R.layout.simple_list_item_1, contents));
 getListView().setTextFilterEnabled(true);

 } catch (IOException e) {
 Log.e(TAG, e.getLocalizedMessage());
 showAlert(3);
 }finally{

 if(mifareClassCard!=null){
 mifareClassCard.debugPrint();
 }
 }
}// End of method
[来源]
Android NFC 开发教程(3): Mifare Tag 读写示例
[额外阅读]
Android NFC 门票系统手机端程序简介